 |
|
 |
|
 |
|
 |
|
 |
|
 |
Middle East | Global |
|
Middle East | Global |
Migration of file shares into SharePoint is neither a new nor unusual requirement.
That said it is often done without appropriate preparation resulting in a poor end result that does not meet the overall objectives of the organisation.
It is a common misconception that you can get the full value out of SharePoint simply by dragging and dropping your existing file structure.
In this article we will run through a simple preparation example to see how easily an improved outcome can be achieved. The article is based around staff (employee) records but the principals apply equally to most profiles of data.
The article covers;
- Scenario – Be clear on the profile of data that you are going migrate.
- Why Migrate? – Make sure there is a case for migration.
- Design and Implement the Destination – Migrated data needs somewhere to live.
- Catalogue the File Share – Catalogue your file shares, get a deeper understand of what is there.
- Prepare the Excel Spread Sheets – Use Excel to cleanse the data and supplement meta data.
- Get User Input – Use Excel to garner use input, particular where the users might need to plug in additional meta data missing from the current source.
- Preparation Complete – You should have a source suitable as input to a migration process.
- Importing the files – How to get the files into SharePoint
Scenario
Our theoretical scenario mirrors what is so often encountered when dealing with file shares.
We have a basic file structure. At the outer nodes the files are stored. The “meta data” is inferred by the location of the file in this structure as shown below.
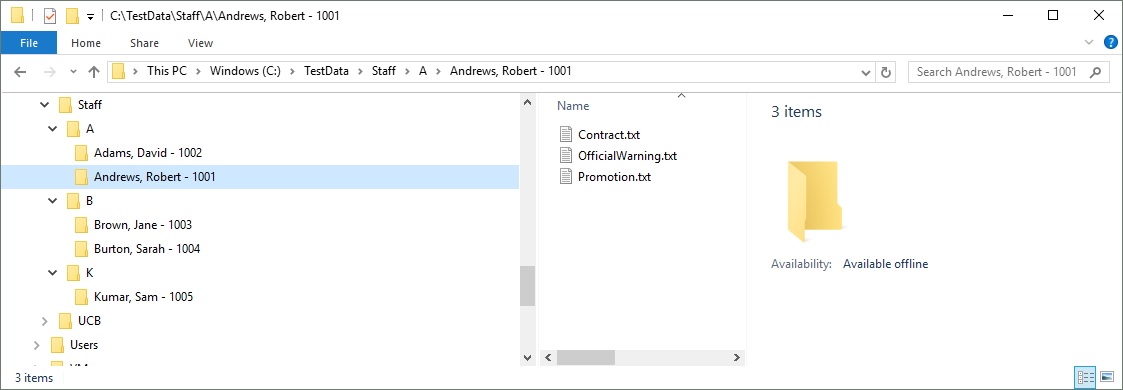
The file share is the only data source. There is no Staff Database. If there was then this might be handled differently with that database providing some of the data.
The example has you have now seen is for some Staff Records. Such records need to be stored in a compliant manner and retention scheduling is key to ensure that we retain only the correct records for each staff member. The requirement in this post is vastly simplified in comparison to most Staff Record scenarios but it serves to illustrate the concepts very well.
Why Migrate?
Be clear on why you are migrating the data into SharePoint before you start the migration process. You may need to design the migration process to ensure that the desired benefits are achieved.
In our scenario the key drivers are;
- Compliance – Specifically data retention scheduling.
- Efficiency – Consolidation into SharePoint.
- Efficiency – Ease of use.
- Efficiency – Process automation.
Design and Implement the Destination
Before you execute migration you need to have a destination to migrate into.
This is key for two reasons;
- Migrating a live file share which is being updated is harder to manage.
- Until you have designed and implemented the destination you won’t necessarily know how to define the import sources, in this example the two Excel spreadsheets.
For our scenario we have implemented;
- A record centre – /sites/Staff/Records.
- A record library – Records
- A top level folder “Staff”
- A content type for each staff folder “Staff Folder” which has a date of leaving field and retention action set from that date.
- A content type for each staff record “Staff Record” which has an employee number field.
- A content type for each disciplinary record “Staff Disciplinary Record” which has an Disciplinary Date and retention action set from that date because these records are kept for a shorter period of time.
It is sometimes useful to catalogue the file shares as part of this design process. This will give you an insight into the scenarios that your destination will need to cope with. The file shares can then be re-catalogued for migration at a later date.
Catalogue the File Share
To catalogue the file share we can use a PowerShell script.
You can run the script either from a PC as a user with access to the file share OR from the server hosting the file share. The script below will audit both the files in the file share and the directories, each to separate CSV files.
An error has occurred. Please try again later. |
The CSV files will contain the basic information that is available from the file system.
Files
An error has occurred. Please try again later. |
Directories
An error has occurred. Please try again later. |
Tip: Try and use UNC paths instead of mapped drive letters when cataloguing file shares.
If you are unsure how to execute PowerShell scripts then pop “how to execute a powershell script” into your favourite search engine.
Prepare the Excel Spread Sheets
The CSV files can be imported to Excel and turned into a spreadsheet.
This will enable us to automate the population of meta data that is so important to the success of migration projects
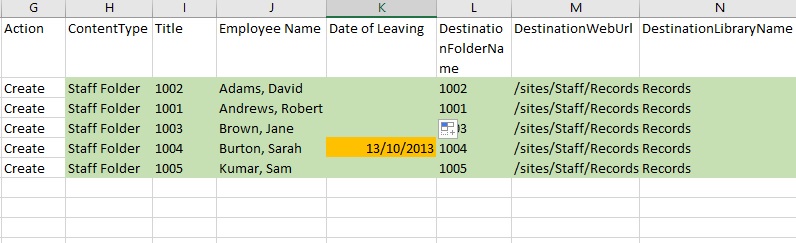
Folders
In Excel we can easily populate some extra columns (shown here in green).
Here we are going to create an import source which will create a folder of content type “Staff Folder” for each staff member. This is going to have the Date of Leaving (which will drive retention schedules) and the staff name as meta data. The employee name and the employee number will be extracted from the folder name from the file system using an Excel formula.

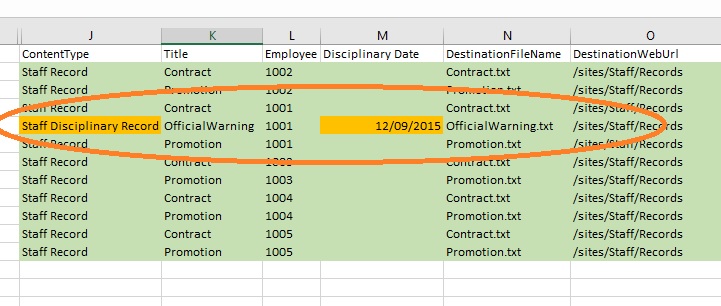
Files
In Excel we can easily populate some extra columns shown in green.
Here we are going to create an import source which will import all of the files for the Staff. The employee number is extracted from the folder name which will tell us destination folder and the set some meta data against each document. This is extracted from the folder path.

Get User Input
One of the strengths of Excel is that most users will have skills in using it.
What this enables us to do is use it to capture from the user base any additional data and permit the users to generally cleanse the data.
Tip: Give the users some guidance notes on how the Excel spreadsheets should be completed.
Folders
Here the user has completed the date of leaving field which in turn will allow SharePoint to manage the retention schedule accordingly.
Files
Here the user has spotted that one file is a disciplinary document. They have therefore changed the disciplinary date and content type accordingly.
Preparation Complete
Once preparation is complete you should have a set of Excel spreadsheets that you can use to drive your folder creation and file migration and which will work with most good SharePoint migration tools including our own.
This should be double checked and quality controlled before you commence the migration process but the core work is done.
Preparation NOT Complete!
Struggling? The likelihood is that the problem is either in the quality of your source data or the design of your destination and these areas will need to be revisited.
The good news is that that you have uncovered the issues at the right time – BEFORE you migration large quantities of data.
Importing the Files
There is a follow-up article here.
